
Hello everyone! In today’s article I’m going to show you how to install Arch Linux the easy way! In a previous video on my channel I showed you how to install Arch Linux manually. While I still recommend that if you’re new, if you’re in my situation where you need to install Arch Linux yet again, and you’ve done it tens if not a hundred or more times before that’s where this article comes in.
Downloading Arch Linux
To download the Arch Linux ISO head to Arch Linux – Downloads find a mirror in your country, click on that, and click the ISO to download. Afterwards, after writing the ISO to a USB using a tool like Rufus – Create bootable USB drives the easy way or loaded it into a VM which you can host using something like Oracle VM VirtualBox. A 50GB drive is plenty of space for an Arch Linux install as its a really lightweight OS! Once you’ve booted into the USB, lets move on to installing Arch Linux!
Installing Arch Linux
You’ll need a Network Connection to be able to install Arch Linux. The easiest way is to use an Ethernet Cable, or use a VM. If not the iwctl utility will allow you to connect to Wifi from your device. Our solution to automatically install Arch Linux! Archinstall! Run the command: archinstall This will launch us into the install menu. The Menu looks like this:
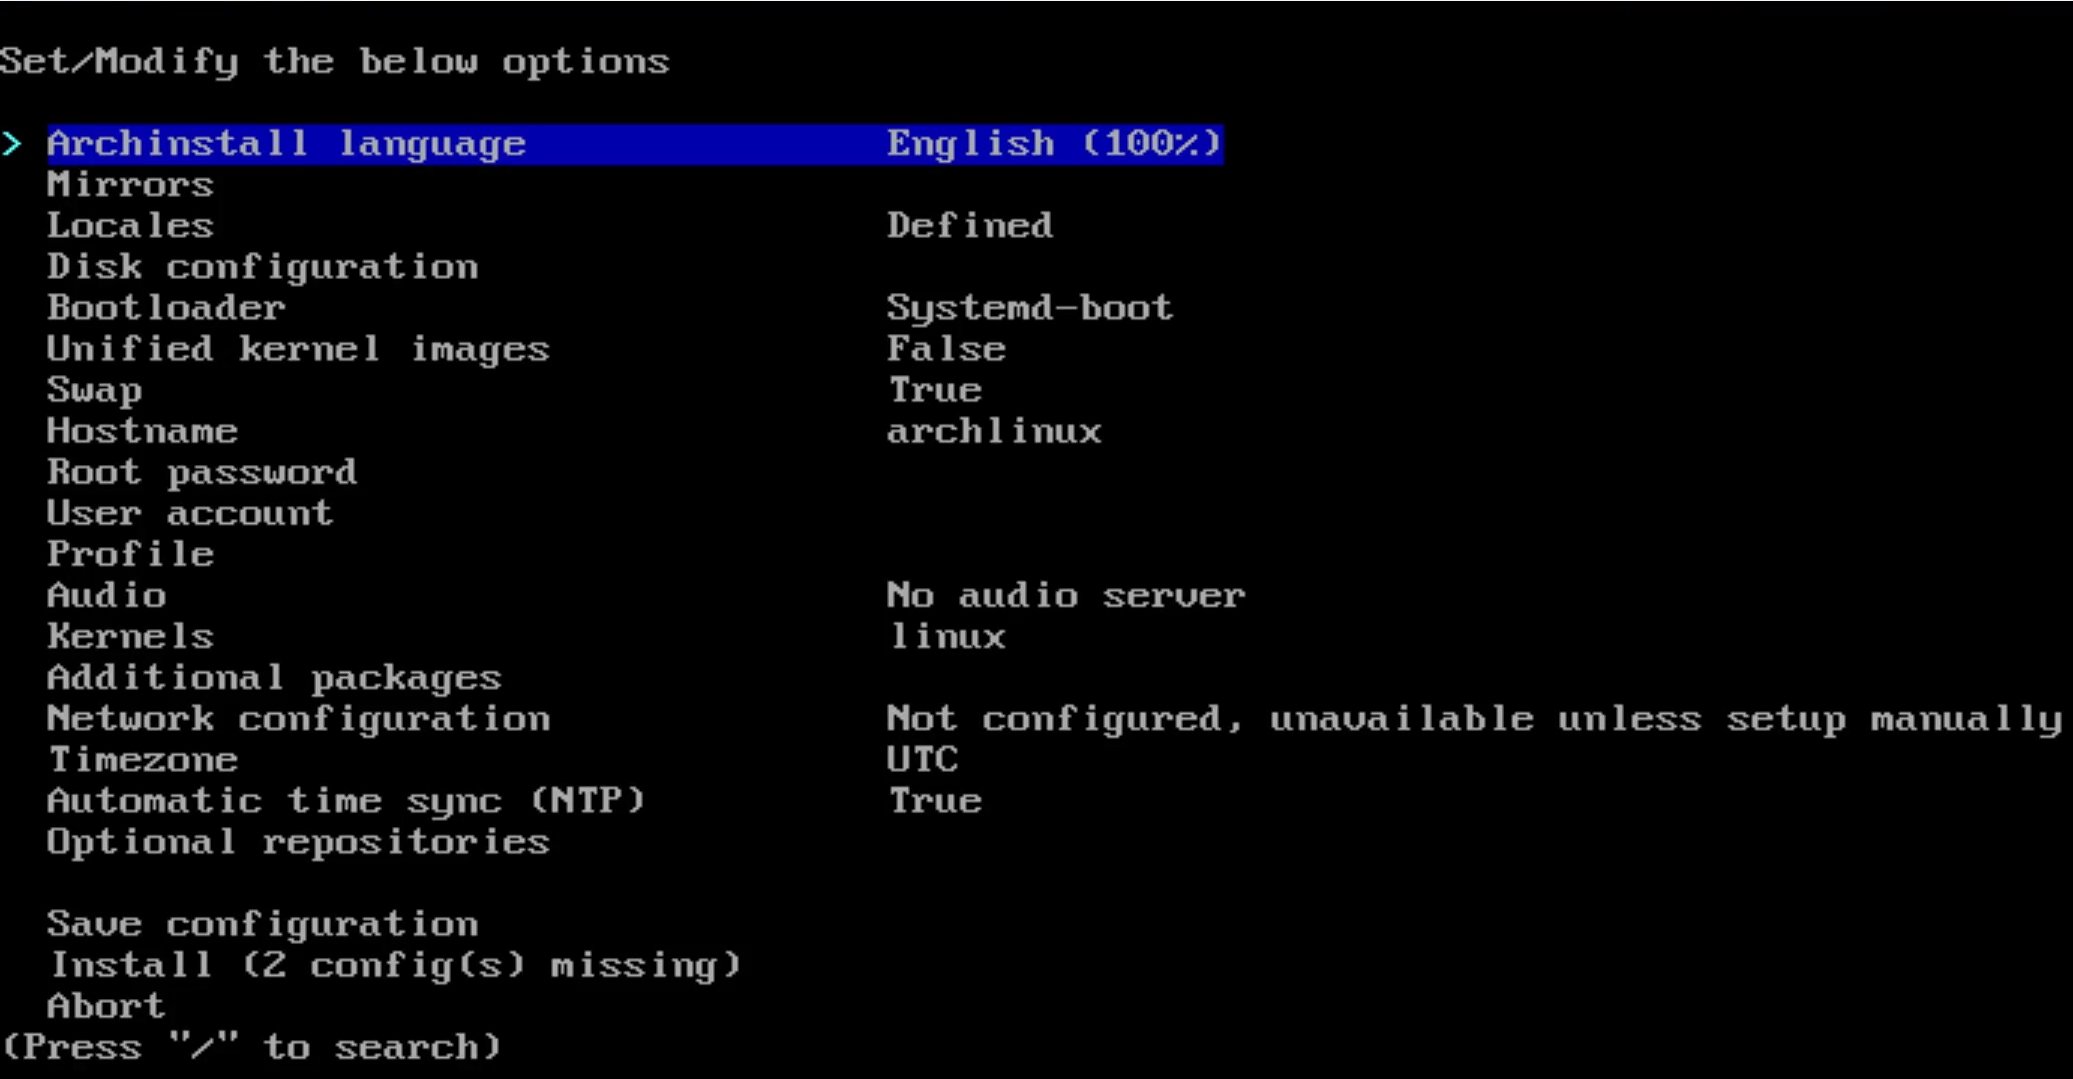
The setup process is fairly self-explanatory, but I’ll cover a few more nuanced things that I tend to do.
- Archinstall language: Set this to whatever language you speak. I speak English so we’ll leave it at default.
- Mirrors: Select your mirror by going down the list and pressing space next to your country. This ensures updates are delivered to your device from the closest servers.
- Locales: This sets stuff like language, file-encoding etc.
- Disk Configuration: In Linux you have 3-4 partitions or segments of your Hard Drive.
- EFI System Partition: Usually 512mb-1GB this holds the Bootloader. (Formatted with the fat32 format by default.)
- SWAP Partition: This is spillover space if you have very little RAM. It’s ALSO used to let your computer hibernate/sleep, so I recommend it even if you have tons of RAM. ( formatted with swap format by default.)
- / Partition: This is your root partition, usually everything is kept on here. The system install files, all your programs and personal files. You’ll need to choose a files system type for this. There are multiple options. ext4, btrfs, xfs and more. I go with ext4 as it’s stable and requires no special configuration or maintenance.
- /home Partition (optional): This is where your personal files are kept. In the video (and for a long time) I didn’t understand why someone would use this. Now it’s clear to me that in the event of a system-reinstall you’d want to leave alone your personal files. That’s why having this separate from the / Partition is useful. It does suck when you make the partition too small and run out of storage in the /home or / partitions though. That’s why I stopped splitting them years ago. The same partition options apply here, but this should match your /home partition ideally.
- Bootloader: In the past many people used GRUB. I recommend just using Systemd-boot at this point. It’s fast, minimal, and gets the job done.
- Unified kernel images: I usually just leave this alone as well.
- Swap: Select this to true if you will ever want to let your computer sleep, or have minimal RAM.
- Hostname: Set your device’s hostname here.
- Root Password: If you want a root account on your system (which I always do) then set the root password here. Otherwise it will be disabled.
- User account: Make yourself a normal user account here. You can give it sudo (admin) rights, but it’s still more secure than logging in as root for everything as sudo has to be explicitly called for you to get those elevated permissions.
- Profile: This is where you can select a pre-configured list of installed applications to include in your install. I leave this alone as well.
- Audio: If you’re doing anything more than a basic server install then choose an audio server. Pipewire is my server of choice at the moment.
- Kernels: You can select the standard linux kernel, the long-term-support version (more stable) and a few other options. I just leave it at the normal kernel.
- Network Configuration: Select NetworkManager here as you’ll need that for you to have network connectivity after the install is done.
- Timezone: Set yours to whatever timezone you’re in. Tip, you can use / to search for options.
- Automatic time sync (NTP): I leave this to true. It keeps your system time on track. Anything internet related will break if you don’t use this.
- Optional repositories: I select multi-lib as I’ll need this in my next Arch post. Hit Enter on Install once you’re done with configuration and it will install! When you’re done, type reboot and press enter. This reboots your device, during which you should take out virtually or physically depending on your setup your installation medium and boot into your new install!
Conclusion
That’s all there is to it! If you enjoyed the video/blog post please let me know in the comments and head on over to YouTube to subscribe and like the video as that really helps me a ton! Look forward to seeing you next week in the next part of my Arch Linux series!
Leave a Reply